DIY Ergonomic Chair & Workstation Hacks – Save Money & Your Back
3 DIY Workstation “Hacks”
Sit, play, and work ergonomically without expensive equipment.
If you’re on a budget or feeling like a bootstrapper; Here are some DIY hacks for your office space and how to turn your office chair into an ergonomic one.
DIY Ergonomic Chair (Lumbar Support)
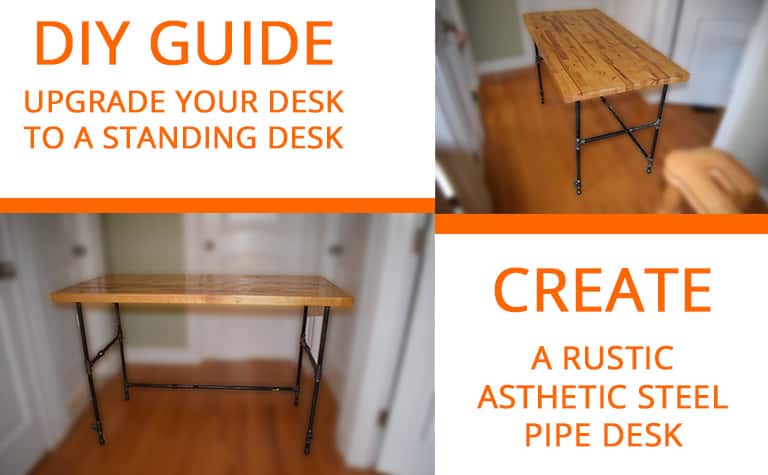
Create Your Own Steel Pipe “Modern” Workstation
Make Your Own Chair, Mat
Most of the equipment you will need is probably lying around the average household. Hence the name of this post.
There are plenty of unorthodox places to find ergonomic chair gear, such as an old car seat or extra chair cushions.
What Features To Look For In An Ergonomic Office Chair to help my posture
What makes an ergonomic office chair..ergonomic? Some features are marketing shticks, but most are important. Here’s a list of what I look for in an ergonomic office chair to support my bad back and better my posture.
- Adjustable Seat Height
- Adjustable Armrest
- Adjustable Back and Lumbar Support
- Adjustable Seat Depth
- Mobility via Quality Caster Wheels
Interested in a more comprehensive list that details each feature and their ergonomic importance? Well, you’re in luck. We researched and detailed the findings a previous post.
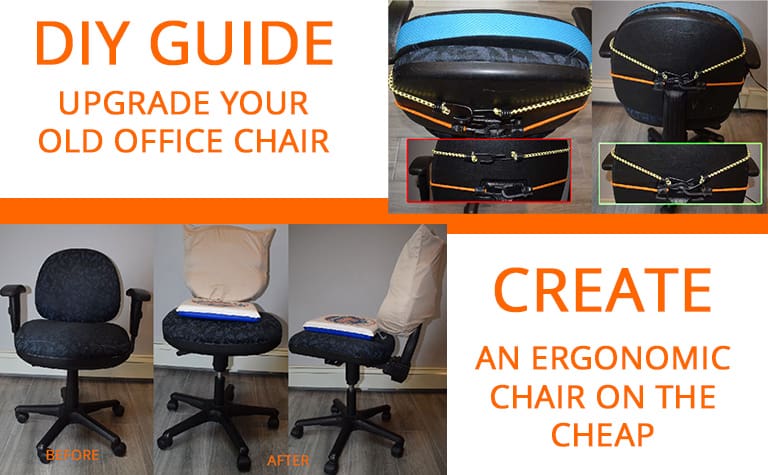
In the time, accumulated getting side tracked with back pain. You could customize your chair to your comfort and add the support your spine dreams about.
DIY Back Seat & Lumbar Support
This is DIY Chair ergonomics 101 and is very simple.
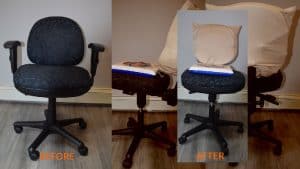
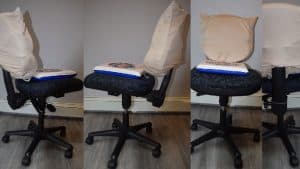
Here is how to create an ergonomic office chair using a support cushion and some bungee cords. This will make a world of change in terms of lumbar support if you do this to an old office chair.
Supplies Needed
- 2+ Bungee Cords
- A Cushion of Your Choice (I prefer stiffer cushions and memory foam is good too.)
- Pillow Case or Comparable Sack
Step 1: alight your support cushion in a comfortable position to your back.
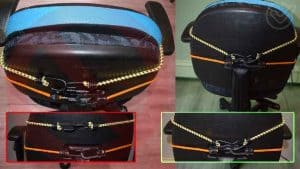
Step 2: Secure the cushion to the chair by wrapping it with bungee cords.
Start with wrapping one bungee around the cushion and connect it on the backside of your
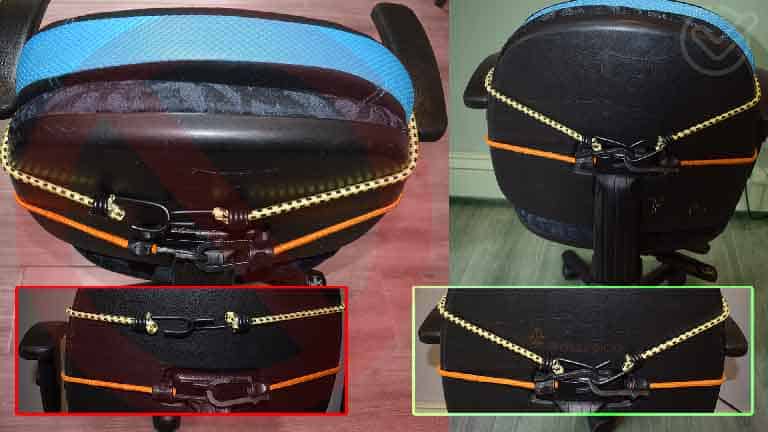
Step 2: Secure the cushion to the chair by wrapping it with bungee cords.
Start with wrapping one bungee cord around the cushion and connect it on the backside of your back-seat pad.
Cross the second bungee so it makes a bow tie shape for better stability.
Take a test sit to make sure everything is comfortable and securely in place.
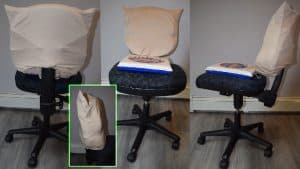
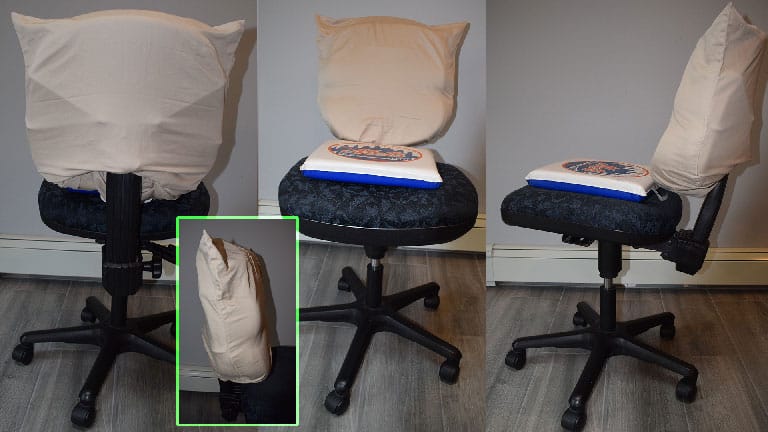
Step 3: Cover the bungee cord and support cushion with a pillowcase or equivalent.
Doing this not only serves as aesthetically pleasing, but is a safety precaution if the bungee cords were to unhook while sitting.
An easy way to find out if you need to use a footrest is if your knees are at a right angle and your feet are not on the floor. Here are solutions that others have found in your situation.
There are many answers for when to take a break while sitting. Some say 5 minutes every 50-60 minutes, while others state 2 minutes every 20-30 minutes, but take a break any time you feel your muscles tighten.
If you're the forgetful type, set a timer on your phone and if your serious about stretching, you can use a desktop program reminder like Stretchly or Big Stretch Reminder.
Replace that expensive name-brand standing desk With this DIY project
The biggest factor to a successful DIY Workstation is commitment.
The prices of your average standing desks have gone up since they become the GO-TO in trendy hipster startup’s workstation.
If sitting is the new smoking then, our workstation has become the “Smokers Corner”.
DIY Standing Desk = Black Steel Pipe + Labor of Love + Butchers Block
Motorized desk is cool, but this is the next best option if you’re frugal and like to live life on the crafty side.
Create a standing desk or conventional workstation; using black steel pipes that are often found at plumbing supply stores and a butcher’s block from Home Depot.
Remember to distribute your weight evenly while sitting with both feet firmly planted on the ground. If the chair has your feet dangling, I recommend getting a footstool.
Be sure that the armrest correctly configured to your comfort. Adjusting the height is easy, but if you need to adjust your width. There is usually a cap or couple bolts underneath the seat that have to be loosened and adjusted accordingly.
If your unable to fit your legs under the desktop (There should be at least enough space to cross your legs over your knees comfortably).
Your desk is too small, and it’s best to invest in a desk that’s the proper height. If your short on cash, putting bricks or hardcover books underneath each leg are two thrifty alternatives.
Need more information on your pursuit for perfect posture? We wrote tips that promote healthy posture at the workstation.
How To Make Your Own Standing Desk
A step-by-step walk-through on constructing your very own steel pipes legged workstation.
I made my pipe desk years ago and would reconstruct it in the name of this post, but found that these 5 tutorial videos all solve your problem.
Each shows a distinct way of constructing a pipe table and worth watching before starting your project.
Supplies Needed
Paint & Polyurethane are unnecessary but can protect as well as spruce up the wood*
Long Pipe 50-inch (1)
Short Pipe 12-inch (2)
Short Pipe 8-inch (4)
Short Pipe 6-inch (4)
Caps for Pipes (4)
Tee Fittings (4)
Flange Fittings (4)
Butchers Block 48”x24” inch (1)
Wood Screws (16)
WD40 “Lubricant”
Step 1: Organize Your Supplies & Preparation
Gather all of your supplies needed and make sure. Make space and lay down the butcher block countertop.
- If you’re going for a clean look, it may be best to spray paint your pipes all the same color. If you want extra protection from spills and stains on your wood block; It’s best to stain the wood with polyurethane, wood conditioners, & or oils.
Step 2: Create the Base for The Legs
Give the threads of the pipes a little spray with WD40. Attach tee fittings to both sides of the long pipe. Make sure the T Fittings are horizontally fastened.
- Using the 8-inch pipes, connect them to both sides of the tee fittings connected to the long pipe.
Step 3: Create the Legs (Using Longer Pipes Will Make The Desk A Standing Desk)
With the long pipe now looking like a capital I. Connect tee fittings to all four 8-inch pipes. Position the tee fittings so the next pipes can be installed with the parallel.
- Connecting 6-inch pipes downward to the floor side of the tee fitting and screw a cap.
- Connecting 12-inch pipes upward to the butcher-block side of the tee fitting.
- Connect flange fittings to the 12-inch pipes that will connect to the butcher’s block.
(Added extra pipe to increase the height if you plan on creating a standing desk.)
Step 4: Connecting The Legs to the Butchers Block
With the legs and the butcher’s block faced down. Measure up the flange fittings to where you want them to be.
QUCK-TIP
Creating a rustic looking black steel pipe desk that is built to last and is a cheaper alternative to the designer desk. If you’re not about the standing workstation, another easier alternative is taking frequent breaks.
- This combined with healthy posture is equivalent in terms of health and if you like me will probably happen, anyway.
The most bottom part of the legs of the desk, let's call them the “feet” can scrape your floor or make permanent indents in your carpet.
- Best for Carpet: Flange Fittings; which look like circular connectors and are used to connect the legs to the wood desktop.
- Best for Hard Floors: Cap Fittings; which looks like thimble
If your consideirng taking on creating your own workstation. We created a step-by-step guide to a DIY standing desk.
There are pros and cons to both types of a desk. It all depends on your specific needs and the lifestyle you want to live.
- Conventional Sitting Desk is best for conventional situations like a classroom or conventional office space.
- Standing Desk is best for active types. Someone who wants to walk on the treadmill as they read their email.
DIY Make Your Own Chair Mat
You forgot to budget in a chair mat after spending your hard earned cash on the perfect workstation? (Ergonomic Chair + Desk + Computer)
Not looking to spend hundreds on a glorified floor covering for your office chair?
Here is a cheaper DIY method for creating premium wooden office chair mats.
STEP 1 | Gather Materials
First, measure out the dimensions of your workspace and decide on how large a mat you want to create. I’m creating a 4×4 ft square.
- Go to your local home improvement store and purchase a piece of plywood. Depending on the wood, the 4×4 cut will range in price between $25–$50 from Home Depot.
- Luxury vinyl flooring will go on top of this 4×4 piece of plywood. A 4×4 vinyl take home sample is only $3 from Home Depot. There are over 200+ distinct patterns. Some noteworthy designs I liked are Scratch Stone, Twilight Oak, and Islander Bamboo.
STEP 2 | Create Your Chair Mat
You back from getting your materials and your read to slap the vinyl onto the plywood, not so fast!
- Lay out the vinyl squares, make sure they’re squared up, and that you can live with the pattern.
- Sand the plywood, so it will better stick with the vinyl and clean of the sides to customize the lip with the wheels of your chair.
- Attaching the vinyl to your plywood should take around 10 minutes, it’s a straightforward process.
STEP 3 | Pat Yourself On The Back, You Created Something Cool, & Saved Money in The Process.
Compared to premium wood chair mats like the Aniji Mountain (47 x 72, 8mm Thick) chair mat, which cost over $200.
QUICK-TIP
A solid surface for your office chair to roll around on is more important than it seems.
- If your interested in persevering your floors, I wrote all about why you need a chair mat.

Related Questions
The most bottom part of the legs of the desk, let's call them the “feet” can scrape your floor or make permanent indents in your carpet.
- Best for Carpet: Flange Fittings; which look like circular connectors and are used to connect the legs to the wood desktop.
- Best for Hard Floors: Cap Fittings; which looks like thimble
If your consideirng taking on creating your own workstation. We created a step-by-step guide to a DIY standing desk.
An easy way to find out if you need to use a footrest is if your knees are at a right angle and your feet are not on the floor. Here are solutions that others have found in your situation.
There are many answers for when to take a break while sitting. Some say 5 minutes every 50-60 minutes, while others state 2 minutes every 20-30 minutes, but take a break any time you feel your muscles tighten.
If you're the forgetful type, set a timer on your phone and if your serious about stretching, you can use a desktop program reminder like Stretchly or Big Stretch Reminder.
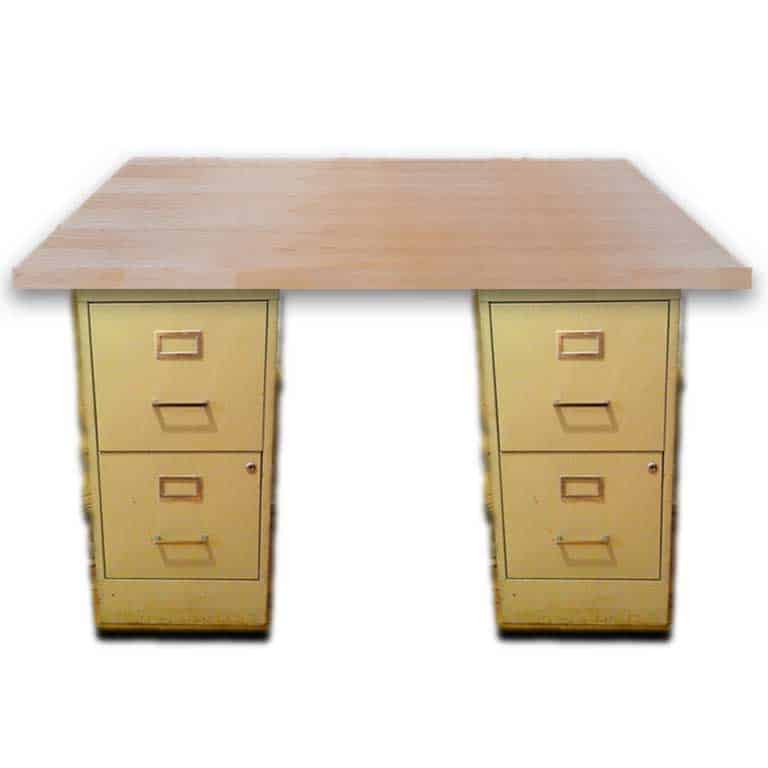
Yes, a hassle free DIY Desk is stacking a butcher's block ontop two metal file cabinets.
This type of desk might be more expensive than the rustic pipe desk above, but there is the added benefit of the cabinets storage.
We all heard that sitting is the new smoking. Standing desk, however, while they have their best case scenarios are not a one size fits all. Taking breaks is a simple and just as an effective alternative to investing in a standing desk.
There are pros and cons to both types of standing workstation solutions. It all depends on your specific working conditions and the lifestyle choices.
Standing desks are more spacious and are the best fits for people who want to use a treadmill while they’re using their computers. They offer a more stable experience compared to a sit-stand converter and better ergonomics.
Sit-Stand converters are better if you already have a built-in desk you don’t want to replace. These types of standing work space solutions also give you more file space than a standing desk.
There are pros and cons to both types of a desk. It all depends on your specific needs and the lifestyle you want to live.
- Conventional Sitting Desk is best for conventional situations like a classroom or conventional office space.
- Standing Desk is best for active types. Someone who wants to walk on the treadmill as they read their email.
SOURCE
“How to Make a Rustic Industrial Black Pipe Bar Table.” YouTube, 2 Jan. 2018, www.youtube.com/watch?v=85HOiAutba0. Accessed 20 Oct. 2019.
“Industrial Computer Desk Build.” YouTube, 22 Oct. 2016, www.youtube.com /watch?v=PbeUKMe5W8o. Accessed 20 Oct. 2019.
“Bar Height Table with Pipe Legs Using Minimal Tools.” YouTube, 28 Dec. 2018, www.youtube.com/watch?v=lHjjcgstHPM. Accessed 20 Oct. 2019.
“DIY DESK (Made w/ Steel Pipes & IKEA Countertop) | Catabot.” YouTube, 28 Nov. 2014, www.youtube.com/watch?v=7HuuW-EM79E. Accessed 20 Oct. 2019.
“DIY Pipe Table.” YouTube, 8 Feb. 2018, www.youtube.com /watch?v=zCYtG8UCDl4. Accessed 20 Oct. 2019.
“Best Clear Wood Finishes for Your Project.” The Home Depot, 2019, www.homedepot.com/c/ab/best-clear-wood-finishes-for-your-project/9ba683603be9fa5395fab90c31963a4. Accessed 20 Oct. 2019.
“What to Choose? Standing Desk vs. Standing Desk Converter.” Workwhilewalking.Com, 2018, www.workwhilewalking.com/standing-desk-vs-sit-stand-converter. Accessed 20 Oct. 2019.
Tips, Linus Tech. “A Quick Warning About the Dangers of Static Electricity & Computer Hardware Linus Tech Tips.” YouTube, YouTube, 22 Dec. 2009, www.youtube.com /watch?v=LgTM6VrEhKQ.
JayzTwoCents. “Will ESD Kill a Computer?” YouTube, YouTube, 2 Mar. 2018, www.youtube.com/watch?v=xdzo-uAvz5Y.
Experts, RamCity – The Upgrade. “Anti-Static Work Mats (ESD Safe) Overview.” YouTube, YouTube, 21 May 2014, www.youtube.com /watch?v=MIYDwbr3C7g.

Claude
ChairPickr | "Writer"
Hello, My name is Claude and I enjoy sitting comfortable. Research into what separates the good from the bad in the matter of chairs started when I made a new year’s resolution to have better posture.
You clicked here to find that first-rate chair. Why not stay and learn some self care?
